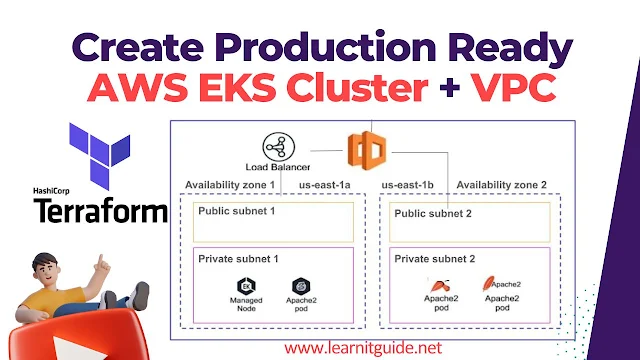
In the previous article, I showed you how to create an AWS EKS cluster with a custom VPC using Terraform modules. That setup was great for a non-production or testing environment.
But here, we’ll take things one step further. We will convert the same setup into a production-ready environment. The key changes? We will deploy our AWS EKS cluster into private subnets and connect it through a NAT Gateway. This is a widely recommended best practice for securing production workloads on AWS.
🛠 Prerequisites
Before you start, make sure these tools are installed and configured on your system.
Terraform – Used to provision infrastructure as code.
👉 Install: terraform command installation
👉 Check with terraform -v
AWS CLI – Needed to interact with AWS services and fetch kubeconfig.
👉 Download: aws.amazon.com/cli
👉 Configure with aws configure
kubectl – To interact with your EKS Kubernetes cluster.
👉 Download: kubernetes.io
You can also watch this tutorial demo on our Youtube Channel
📁 Setting Up the Terraform Project
I’m using Visual Studio Code. I copied the previous project folder eks-terraform-demo and renamed it to eks-terraform-demo-prod. This way we reuse all the Terraform files we created earlier and just tweak them for production.
$ ls -lrt eks-terraform-demototal 7-rw-r--r-- 1 skuma 197609 136 Jul 8 20:25 outputs.tf-rw-r--r-- 1 skuma 197609 43 Jul 9 08:05 provider.tf-rw-r--r-- 1 skuma 197609 467 Jul 9 12:09 vpc.tf-rw-r--r-- 1 skuma 197609 559 Jul 9 13:40 eks.tfskuma@hp MINGW64 /d/Learning/codes/Terraform$ ls -lrt eks-terraform-demo-prod/total 76-rw-r--r-- 1 skuma 197609 136 Jul 8 20:25 outputs.tf-rw-r--r-- 1 skuma 197609 43 Jul 9 08:05 provider.tf-rw-r--r-- 1 skuma 197609 650 Jul 9 13:42 vpc.tf-rw-r--r-- 1 skuma 197609 627 Jul 9 19:29 eks.tf
🏗️ VPC Changes for Production
Inside vpc.tf, I made several important changes:
module "vpc" {
source = "terraform-aws-modules/vpc/aws"
version = "~> 5.0"
name = "flipkart-vpc-prod" #changed name to match prod.
cidr = "10.0.0.0/16"
azs = ["us-east-1a", "us-east-1b"]
public_subnets = ["10.0.1.0/24", "10.0.2.0/24"]
private_subnets = ["10.0.11.0/24", "10.0.12.0/24"]
map_public_ip_on_launch = true
enable_nat_gateway = true #changed to true
single_nat_gateway = true #added for prod
public_subnet_tags = {
"kubernetes.io/role/elb" = 1
}
#Added for prod
private_subnet_tags = {
"kubernetes.io/role/internal-elb" = 1
}
tags = {
Terraform = "true"
}
}
VPC Name changed to flipkart-vpc-prod
map_public_ip_on_launch = true (kept as-is)
enable_nat_gateway = true – this allows private subnets to access the internet
single_nat_gateway = true – avoids creating multiple NATs to save cost
Added tags to private subnets – this is required for Kubernetes to provision internal load balancers
These changes ensure that our worker nodes will be launched in private subnets and still have internet access via the NAT Gateway — a common and secure setup in production environments.
⚙️ EKS Cluster Changes
In eks.tf, I made the following updates:
module "eks" {
source = "terraform-aws-modules/eks/aws"
version = "~> 20.0"
cluster_name = "flipkart-eks-prod" #changed name to match prod
cluster_version = "1.31"
vpc_id = module.vpc.vpc_id
subnet_ids = module.vpc.private_subnets #changed to private subnets
cluster_endpoint_public_access = true
enable_cluster_creator_admin_permissions = true
eks_managed_node_groups = {
default = {
instance_types = ["t3.medium"]
min_size = 1
max_size = 2
desired_size = 1
}
}
tags = {
Environment = "prod" #changed to prod
}
}
Cluster Name changed to flipkart-eks-prod
Subnet IDs updated to use private subnets instead of public ones
Tag updates to reflect environment as "prod"
The cluster endpoint and public access settings were kept the same for now. You can make them private if needed.
🔧 Terraform Apply Configuration
It's Time to deploy the infrastructure using terraform apply command, but I have initialized the terraform, so first i will initiate it.
terraform initterraform apply -auto-approve
Once done, you’ll see the output: your cluster endpoint and name.
✅ Verifying EKS Cluster Setup
Go to the AWS Console → EKS → You’ll see the new cluster flipkart-eks-prod in "Active" status.
Check the EC2 instances – a new instance should appear, deployed into your private subnet (e.g., CIDR 10.0.11.0/24).
🔗 Connect AWS EKC Cluster using kubectl
Configure your local kubeconfig to interact with the new cluster:
aws eks update-kubeconfig --region us-east-1 --name flipkart-eks-prod
Then test the connection:
kubectl get nodes
You should see one worker node up and ready.
🌐 Deploy Test App Deployment
Now let’s deploy a basic Apache web app and expose it.
kubectl run apache --image=httpd --port=80kubectl get pods
Expose it using a LoadBalancer:
kubectl expose pod apache --type=LoadBalancer --port=80 --target-port=80kubectl get svc
You’ll get a LoadBalancer hostname (likely internal, since it’s running in a private subnet).
🔓 Allow HTTP Temporarily (For Testing Only)
If needed, open port 80:
Go to EC2 → Security Groups → Find the EKS node group SG
Add an inbound rule: HTTP (80), source: 0.0.0.0/0
Visit the LoadBalancer URL in your browser (use http://, not https://). You might get a "Not Secure" warning — just proceed for this test.
If it loads the Apache default page, then everything is working!
📌 Bonus Tip: Avoid One Service = One LoadBalancer
For a real production workload, exposing each pod with its own LoadBalancer is not ideal. You’ll end up with high cost and complex routing.
Instead, deploy an Ingress Controller (like NGINX or HAProxy) in front of your cluster. We’ve already covered how to deploy Ingress Controllers — check out our earlier tutorials for that.
This is now a production-ready Kubernetes environment on AWS using Terraform.


0 Comments