This tutorial post will help you to Create Kubernetes Deployment, Services & Pods Using Kubectl.
We can deploy the application in kubernetes by creating deployment, services and pods using kubectl command or using yaml configuration files.In the previous posts, already we have explained the below topics. Refer those links to understand this topic from basics.
What is Kubernetes - Learn Kubernetes from Basics
How to Install Kubernetes Cluster with Docker on Linux
Create Kubernetes YAML for Deployment, Service & Pods
What is Docker - Get Started from Basics - Docker Tutorial
What is Container, What is Docker on Container - Get Started
How to Install Docker on CentOS 7 / RHEL 7
Docker Images Explained with Examples - Docker Tutorial
How to Run Docker Containers - Explained with Examples
How to Create Kubernetes Deployment, Services & Pods Using Kubectl
Let's get started.
What is Deployment in Kubernetes?
Deployment is a controller which manages the pods and It ensures the desired number of pods are always running.What is Pod in Kubernetes?
Pod is a group of one or more containers for an application which runs on worker (minion) nodes.For example, Let's create a deployment controller for httpd web server, It would run a single container within a pod using a docker image "httpd" and it will listen on port 80.
Also You can Watch this Tutorial video on our YouTube Channel - Create Kubernetes Deployment, Services & Pods Using Kubectl.
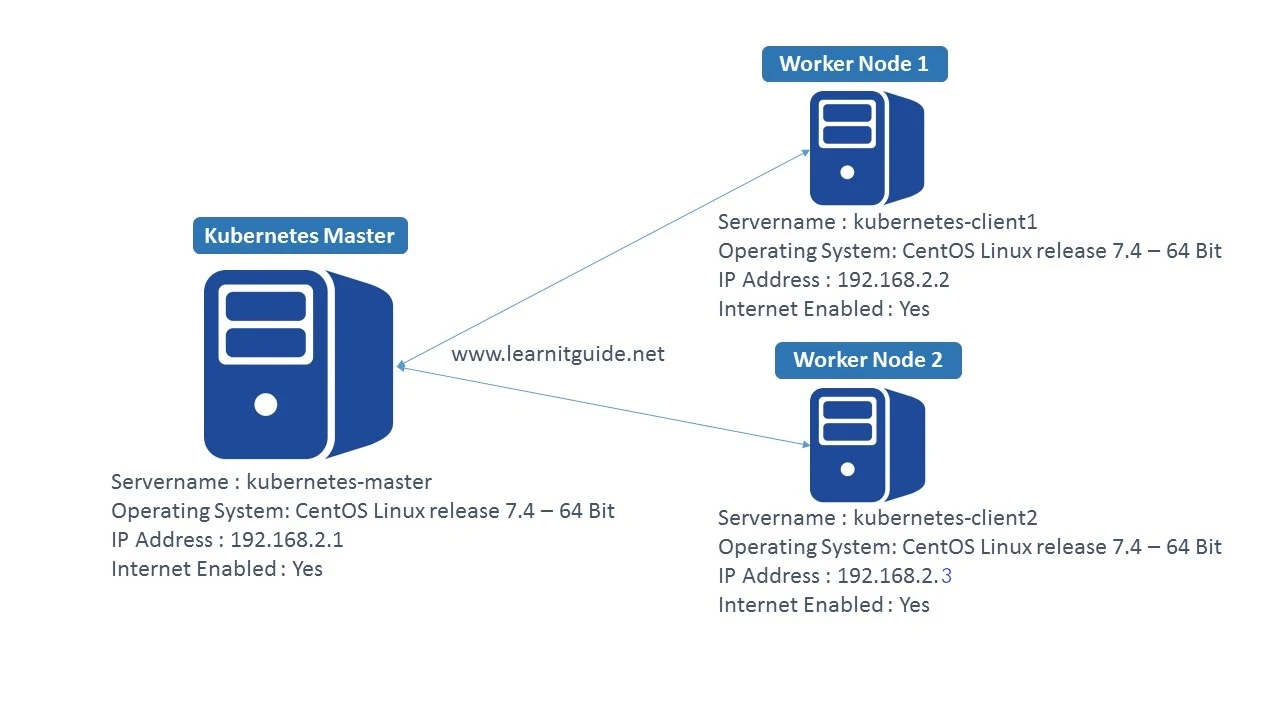
Our Lab Setup:

How to Create Kubernetes Deployment and Pods?
Once you have Working Kubernetes Cluster environment, Use "kubectl" command to create a Kubernetes Deployment. Else, Refer this article how to install kubernetes cluster on Linux.[root@kubernetes-master ~]# kubectl run my-httpd --image=httpd --replicas=1 --port=80
deployment.apps/my-httpd created
Where, "kubectl run" is the command to run the deployment.
"my-httpd" - Used to define the name of the deployment controller
"--image=httpd" - Used to specify which image to be used for the container.
"--replicas=1" - Used to specify number of pods(replication) to be running.
"--port=80" - Used to specify the pods to listen on port 80 locally.
Check the status of deployment
Use "kubectl get deployment" command to display the status of deployments created.
[root@kubernetes-master ~]# kubectl get deployment
NAME DESIRED CURRENT UP-TO-DATE AVAILABLE AGE
my-httpd 1 1 1 1 30m
Above command gives us the status of deployment with,
NAME - Name of the deployment,
DESIRED - Number of Desired Pods,
CURRENT - Number of Current Pods,
UP-TO-DATE - Number of Pods are up-to-date,
AVAILABLE - Number of Pods are available
AGE - How long the pods are running.
Also you can use above command with "-o wide" option to get additional details,
CONTAINERS - List of containers associated to this pods
IMAGES - List of Images used in this pods
SELECTOR - Name of the selectors.
[root@kubernetes-master ~]# kubectl get deployment -o wide
NAME DESIRED CURRENT UP-TO-DATE AVAILABLE AGE CONTAINERS IMAGES SELECTOR
my-httpd 1 1 1 1 32m my-httpd httpd run=my-httpd
Check the status of Pods
Use "kubectl get pod" command to display the status of pods.
[root@kubernetes-master ~]# kubectl get pod
NAME READY STATUS RESTARTS AGE
my-httpd-85fc77d457-cr8jl 1/1 Running 0 37m
Above command gives us the status of pods with,
NAME - Name of the pod,
READY - How many pods are ready out of total pods.
STATUS - Status of pods
RESTARTS - How many times it has restarted
AGE - How long the pods are running.
Again use "-o wide" option to get additional details,
IP - IP address of the pod assigned from the CIDR range been set already during the kubernetes setup, this IP address can be used to access the pod.
NODE - Name of the node on which pod is running.
NOMINATED - Name of the Reserved node.
[root@kubernetes-master ~]# kubectl get pod -o wide
NAME READY STATUS RESTARTS AGE IP NODE NOMINATED NODE
my-httpd-85fc77d457-cr8jl 1/1 Running 0 51m 172.16.1.2 kubernetes-client1.learnitguide.net <none>
From above output, our "my-httpd" pod is running on worker node "kubernetes-client1.learnitguide.net" and it has got IP Address "172.16.1.2". So we would be able to access the httpd web server through this IP Address "172.16.1.2" only from the worker node "kubernetes-client1.learnitguide.net".
Let's Login into the Worker node "kubernetes-client1.learnitguide.net" and use "curl" command to check the pods are working fine and accessible.
[root@kubernetes-client1 ~]# curl 172.16.1.5:80
<html><body><h1>It works!</h1></body></html>
[root@kubernetes-client1 ~]#
As expected, it's working from the worker node. Lets create a service to expose the ports externally. so that, any users can access the pods from other systems.
What is Service in Kubernetes?
Service is an endpoint that exposes the ports to the outside world and mapped the port to the container port (target port).Creating Kubernetes Service
Let's Create a Service to expose the deployment "my-httpd" to port 8080 and connects to the containers on port 80, this would assign a random port number. Using that port, we can access this pods externally.[root@kubernetes-master ~]# kubectl expose deployment my-httpd --port=8080 --target-port=80 --type=LoadBalancer
Check the status of Service to find the random port number.
[root@kubernetes-master ~]# kubectl get svc
NAME TYPE CLUSTER-IP EXTERNAL-IP PORT(S) AGE
kubernetes ClusterIP 10.96.0.1 <none> 443/TCP 5h
my-httpd LoadBalancer 10.110.252.204 <pending> 8080:31255/TCP 1m
Newly created service has got port number "31255" for "my-httpd" deployment and we know this pod is running on worker node "kubernetes-client1.learnitguide.net".
Now we we will be able to access this using the URL "http://kubernetes-client1.learnitguide.net:31255". from other system if you are in the same network.
[root@lab-server ~]# curl http://kubernetes-client1.learnitguide.net:31255
<html><body><h1>It works!</h1></body></html>
[root@lab-server ~]#
Confused with lot of ports? Simple!
kubernetes-client1.learnitguide.net:31255 --> kubernetes-client1.learnitguide.net:8080 --> 172.16.1.5:80.
This is what the purpose of service, It exposes the ports to the outside world with some random port and mapped the port to the target port, finally it redirects to the actual container port...
That's it, Hope you have got an idea how to create kubernetes deployments, services and pods using kubectl. Going forward we will play more with kubernetes tool.
If you are interested in learning, Request you to go through the below recommended tutorial.
DevOps Full Course Tutorial for Beginners - DevOps Free Training Online
Docker Full Course Tutorial for Beginners - Docker Free Training Online
Kubernetes Full Course Tutorial for Beginners - Kubernetes Free Training Online
Ansible Full Course Tutorial for Beginners - Ansible Free Training Online
Openstack Full Course Tutorial for Beginners - Openstack Free Training Online
Keep practicing and have fun. Leave your comments if any.
Stay connected with us on social networking sites, Thank you.


0 Comments