
If you are new to kubernetes and want to learn about kubernetes from basics, Refer the below links and also you can checkout all tutorial videos for free on YouTube and do subscribe for more free videos.
What is Kubernetes - Learn Kubernetes from Basics
How to Install Kubernetes on Linux (RedHat / CentOS)
How to Install Kubernetes On Ubuntu 16.04 LTS
How to Create Kubernetes Deployment, Services & Pods Using Kubectl
How to Create Kubernetes YAML for Deployment, Service & Pods
Kubernetes Volumes Explained with Examples
Kubernetes Persistent Volumes and Claims Explained
Also You can Watch this Entire Tutorial video on our YouTube Channel - Kubernetes Multi Master Setup with LoadBalancer on Ubuntu.
Kubernetes Multi Master Setup with LoadBalancer on Ubuntu
Kubernetes Multi Master Architecture Lab Setup:
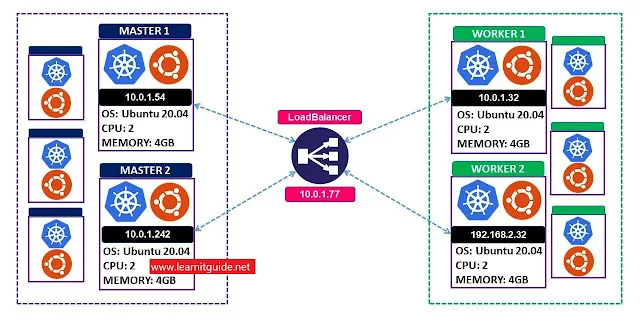
Minimum 2 CPU's with 4Gb Memory is required.
Note: All nodes are installed with Ubuntu 20.04. You can add multiple worker nodes as you want and follow the steps given. Only due to my limitation and pricing, i used minimum worker node. Agenda of this tutorial is to have multi master node setup, since no need to worry about worker nodes.
Prerequisites:
1. Users must have root or sudo access to perform administrative tasks. (switchover to root user to avoid unnecessary permission issues).
2. (OPTIONAL )- Make an entry of each host in /etc/hosts file for name resolution on all nodes as below or configure it on DNS if you have DNS Server.
$ cat /etc/hosts
10.0.1.77 haproxy-lb
10.0.1.54 kubernetes-master1
10.0.1.252 kubernetes-master2
10.0.1.32 kubernetes-worker1
3. Make sure all the nodes are reachable between each others.
4. Internet must be enabled on all nodes, because we will be using official repositories to download and install required packages to setup kubernetes cluster.
Steps Involved for Kubernetes Multi Master Setup.
On HAProxy Server:
1. Install HAProxy
2. Configure HAProxy
3. Start and Enable HAProxy.
On all kubernetes nodes:
4. Prerequisites Kubernetes Configurations
5. Enable Docker and Kubernetes Repository
6. Install kubernetes packages - kubeadm, kubelet and kubectl.
On Kubernetes Master Nodes - Anyone Node:
7. Initializing and Setting up Kubernetes Master Node.
8. Post Kubernetes Cluster Setup
9. Install Network add-on to enable the communication between the pods.
On Other Kubernetes Master Nodes:
10. Join all Kubernetes Master nodes
On Other Kubernetes Worker Nodes:
11. Join all Kubernetes Worker Nodes
Let's Get Started.
On HAProxy Server (IP: 10.0.1.77):
1. Install HAProxy
Use apt-get command to install HAProxy package as below.
2. Configure HAProxy
Once HAproxy is installed, configure HAProxy to forward the traffic across the kubernetes master nodes.
Edit the config file /etc/haproxy/haproxy.cfg to define the frontend and backend configuration and append the below config. Replace the IP Address with your HaProxy and Kubernetes Master Nodes.
3. Start and Enable HAProxy.
Use systemctl command to start and enable the HAProxy service as below.
On all kubernetes nodes:
4. Prerequisites Kubernetes Configurations
Kubernetes doesnt support "Swap". Disable swap on all kubernetes nodes and also to make it permanent, comment out the swap entry in /etc/fstab file as below.
Allow sysctl to pass bridged traffic of IPv4 and IPv6 to iptables chains for Kubernetes networking.
5. Enable Docker and Kubernetes Repository
Before begin, we must update the Ubuntu repositories and install basic tools like apt-transport-https, curl and etc,.
Once installation is completed, enable and install docker on all nodes.
Afer docker installation, add kubernetes signing key and add kubernetes repository on all nodes.
6. Install kubernetes packages.
Use apt-get command to install kubeadm, kubelet and kubectl packages with specific version.. Very newer version 1.21.x, 1.22.x are not worked on Ubuntu 20.04.
Make sure kubelet service is running or not.
On Kubernetes Master Nodes - Anyone Node (10.0.1.54):
7. Initializing and Setting up kubernetes master node.
Only on first kubernetes master node, Use "kubeadm" command to initialize the kubernetes cluster along with "--control-plane-endpoint", "apiserver-advertise-address" and "--pod-network-cidr" options. It is used to specify the control plane server IP Address, IP address for kubernetes cluster communication and range of networks for the pods respectively.
Output Trimmed:
Once Kubernetes cluster initialization is completed, Copy the join token highlighted in yellow color to join any number of the control-plane node.
Copy the other join token highlighted in red color to any number of worker nodes.
Store it in a secure location, it may be required for you later.
8. Post Kubernetes Cluster Setup
To start using your cluster, you need to run the following as if you have logged in as regular user:
Alternatively, if you are the root user, you can run the below, even I have logged in as root user:
9. Install Network add-on to enable the communication between the pods.
We have lot of network add-on available to enable the network communication with different functionality, Here I have used Calico network provider.
10. Join all Other Kubernetes Master nodes:
Login into other kubernetes master nodes and use the join token of control plane (highlighted in yellow color).
Replace with your join token of master nodes.
11. Join all Kubernetes Worker Nodes:
Login into other kubernetes worker nodes and use the join token of worker nodes (highlighted in red color).
Once all done, verify the list of nodes been added to the kubernetes cluster using the below command.
Thats all, we are done with Kubernetes Multi Master Setup with LoadBalancer on Ubuntu.
Also refer below related articles and checkout all tutorial videos for free on youtube.
What is Kubernetes - Learn Kubernetes from Basics
How to Install Kubernetes on Linux (RedHat / CentOS)
How to Install Kubernetes On Ubuntu 16.04 LTS
How to Create Kubernetes Deployment, Services & Pods Using Kubectl
How to Create Kubernetes YAML for Deployment, Service & Pods
Kubernetes Volumes Explained with Examples
Kubernetes Persistent Volumes and Claims Explained
Keep practicing and have fun. Leave your comments if any.
Support Us: Share with your friends and groups.
Stay connected with us on social networking sites, Thank you.
On HAProxy Server (IP: 10.0.1.77):
1. Install HAProxy
Use apt-get command to install HAProxy package as below.
# apt update && apt install -y haproxy
2. Configure HAProxy
Once HAproxy is installed, configure HAProxy to forward the traffic across the kubernetes master nodes.
Edit the config file /etc/haproxy/haproxy.cfg to define the frontend and backend configuration and append the below config. Replace the IP Address with your HaProxy and Kubernetes Master Nodes.
frontend kubernetes
bind 10.0.1.77:6443
option tcplog
mode tcp
default_backend kubernetes-master-nodes
backend kubernetes-master-nodes
mode tcp
balance roundrobin
option tcp-check
server kubernetes-master1 10.0.1.54:6443 check fall 3 rise 2
server kubernetes-master2 10.0.1.242:6443 check fall 3 rise 2
3. Start and Enable HAProxy.
Use systemctl command to start and enable the HAProxy service as below.
# systemctl restart haproxy
# systemctl enable haproxy
On all kubernetes nodes:
4. Prerequisites Kubernetes Configurations
Kubernetes doesnt support "Swap". Disable swap on all kubernetes nodes and also to make it permanent, comment out the swap entry in /etc/fstab file as below.
# swapoff -a; sed -i '/swap/d' /etc/fstab
Allow sysctl to pass bridged traffic of IPv4 and IPv6 to iptables chains for Kubernetes networking.
cat >>/etc/sysctl.d/kubernetes.conf<<EOF
net.bridge.bridge-nf-call-ip6tables = 1
net.bridge.bridge-nf-call-iptables = 1
EOF
5. Enable Docker and Kubernetes Repository
Before begin, we must update the Ubuntu repositories and install basic tools like apt-transport-https, curl and etc,.
# apt-get update && apt install -y apt-transport-https ca-certificates curl gnupg-agent software-properties-common
Once installation is completed, enable and install docker on all nodes.
# curl -fsSL https://download.docker.com/linux/ubuntu/gpg | apt-key add -
# add-apt-repository "deb [arch=amd64] https://download.docker.com/linux/ubuntu $(lsb_release -cs) stable"
# apt update && apt install -y docker-ce containerd.io
Afer docker installation, add kubernetes signing key and add kubernetes repository on all nodes.
# curl -s https://packages.cloud.google.com/apt/doc/apt-key.gpg | apt-key add -
# echo "deb https://apt.kubernetes.io/ kubernetes-xenial main" > /etc/apt/sources.list.d/kubernetes.list
6. Install kubernetes packages.
Use apt-get command to install kubeadm, kubelet and kubectl packages with specific version.. Very newer version 1.21.x, 1.22.x are not worked on Ubuntu 20.04.
# apt update && apt install -y kubeadm=1.20.0-00 kubelet=1.20.0-00 kubectl=1.20.0-00
Make sure kubelet service is running or not.
# systemctl status kubelet
On Kubernetes Master Nodes - Anyone Node (10.0.1.54):
7. Initializing and Setting up kubernetes master node.
Only on first kubernetes master node, Use "kubeadm" command to initialize the kubernetes cluster along with "--control-plane-endpoint", "apiserver-advertise-address" and "--pod-network-cidr" options. It is used to specify the control plane server IP Address, IP address for kubernetes cluster communication and range of networks for the pods respectively.
# kubeadm init --control-plane-endpoint="10.0.1.77:6443" --upload-certs --apiserver-advertise-address=10.0.1.54 --pod-network-cidr=192.168.0.0/16
Output Trimmed:
Your Kubernetes control-plane has initialized successfully!
To start using your cluster, you need to run the following as a regular user:
mkdir -p $HOME/.kube
sudo cp -i /etc/kubernetes/admin.conf $HOME/.kube/config
sudo chown $(id -u):$(id -g) $HOME/.kube/config
Alternatively, if you are the root user, you can run:
export KUBECONFIG=/etc/kubernetes/admin.conf
You should now deploy a pod network to the cluster.
Run "kubectl apply -f [podnetwork].yaml" with one of the options listed at:
https://kubernetes.io/docs/concepts/cluster-administration/addons/
You can now join any number of the control-plane node running the following command on each as root:
kubeadm join 10.0.1.77:6443 --token pdrhap.w5ynabi9aa24l9cc
--discovery-token-ca-cert-hash sha256:ccdede9a044092b93b720f05b4172da8b10070f0fa4a56445b0a27bdc0d5eaba
--control-plane --certificate-key 4520073a1f14e58d48a1fb3515b6bac3be41cac89ed51561067783b1a24684ac
Please note that the certificate-key gives access to cluster sensitive data, keep it secret!
As a safeguard, uploaded-certs will be deleted in two hours; If necessary, you can use
"kubeadm init phase upload-certs --upload-certs" to reload certs afterward.
Then you can join any number of worker nodes by running the following on each as root:
kubeadm join 10.0.1.77:6443 --token pdrhap.w5ynabi9aa24l9cc
--discovery-token-ca-cert-hash sha256:ccdede9a044092b93b720f05b4172da8b10070f0fa4a56445b0a27bdc0d5eaba
Once Kubernetes cluster initialization is completed, Copy the join token highlighted in yellow color to join any number of the control-plane node.
Copy the other join token highlighted in red color to any number of worker nodes.
Store it in a secure location, it may be required for you later.
8. Post Kubernetes Cluster Setup
To start using your cluster, you need to run the following as if you have logged in as regular user:
# mkdir -p $HOME/.kube
# sudo cp -i /etc/kubernetes/admin.conf $HOME/.kube/config
# sudo chown $(id -u):$(id -g) $HOME/.kube/config
Alternatively, if you are the root user, you can run the below, even I have logged in as root user:
# export KUBECONFIG=/etc/kubernetes/admin.conf
9. Install Network add-on to enable the communication between the pods.
We have lot of network add-on available to enable the network communication with different functionality, Here I have used Calico network provider.
# kubectl create -f https://docs.projectcalico.org/v3.15/manifests/calico.yaml
10. Join all Other Kubernetes Master nodes:
Login into other kubernetes master nodes and use the join token of control plane (highlighted in yellow color).
# kubeadm join 10.0.1.77:6443 --token pdrhap.w5ynabi9aa24l9cc
--discovery-token-ca-cert-hash sha256:ccdede9a044092b93b720f05b4172da8b10070f0fa4a56445b0a27bdc0d5eaba
--control-plane --certificate-key 4520073a1f14e58d48a1fb3515b6bac3be41cac89ed51561067783b1a24684ac
Replace with your join token of master nodes.
11. Join all Kubernetes Worker Nodes:
Login into other kubernetes worker nodes and use the join token of worker nodes (highlighted in red color).
# kubeadm join 10.0.1.77:6443 --token pdrhap.w5ynabi9aa24l9cc--discovery-token-ca-cert-hash sha256:ccdede9a044092b93b720f05b4172da8b10070f0fa4a56445b0a27bdc0d5eaba
Replace with your join token of worker nodes.
Once all done, verify the list of nodes been added to the kubernetes cluster using the below command.
# kubectl get nodes.
Thats all, we are done with Kubernetes Multi Master Setup with LoadBalancer on Ubuntu.
Also You can Watch this Entire Tutorial video on our YouTube Channel - Kubernetes Multi Master Setup with LoadBalancer on Ubuntu.
Also refer below related articles and checkout all tutorial videos for free on youtube.
What is Kubernetes - Learn Kubernetes from Basics
How to Install Kubernetes on Linux (RedHat / CentOS)
How to Install Kubernetes On Ubuntu 16.04 LTS
How to Create Kubernetes Deployment, Services & Pods Using Kubectl
How to Create Kubernetes YAML for Deployment, Service & Pods
Kubernetes Volumes Explained with Examples
Kubernetes Persistent Volumes and Claims Explained
Keep practicing and have fun. Leave your comments if any.
Stay connected with us on social networking sites, Thank you.


0 تعليقات